Opt Lasers G-Code Generator

Opt Lasers Software Usage
This section will explain step by step how to use and export the G- code generated with the Opt Lasers G-Code Generator. Then how to import that G -code into Grbl-Panel and control your machine to run the engraving G -code.
Opt Lasers G-Code Generator
There are two primary image types that you can work with Vector and Raster.
These image types present different ways of engraving, each with their own benefits.
Choose / Create your design and export it as a DFX, or BMP/JPG.
Getting Started with Opt Lasers G-Code Generator:
- Download and install Opt Lasers G-Code Generator.
- Select the DFX Tab, if you are engraving / cutting based on a vector as a DFX file.
- Select the BMP/JPG Tab, if you are engraving based of a raster image as a BMP/JPG file.
Vector: DFX
DFX is a vector file type.
Vector engraving / cutting is preferred when cutting or doing quick engravings.
Vector engraving will generally follow the path of the engraving, as opposed to scanning over it.
Reference the Common Cutting Parameters for a good starting place for some common materials
- Download and Install
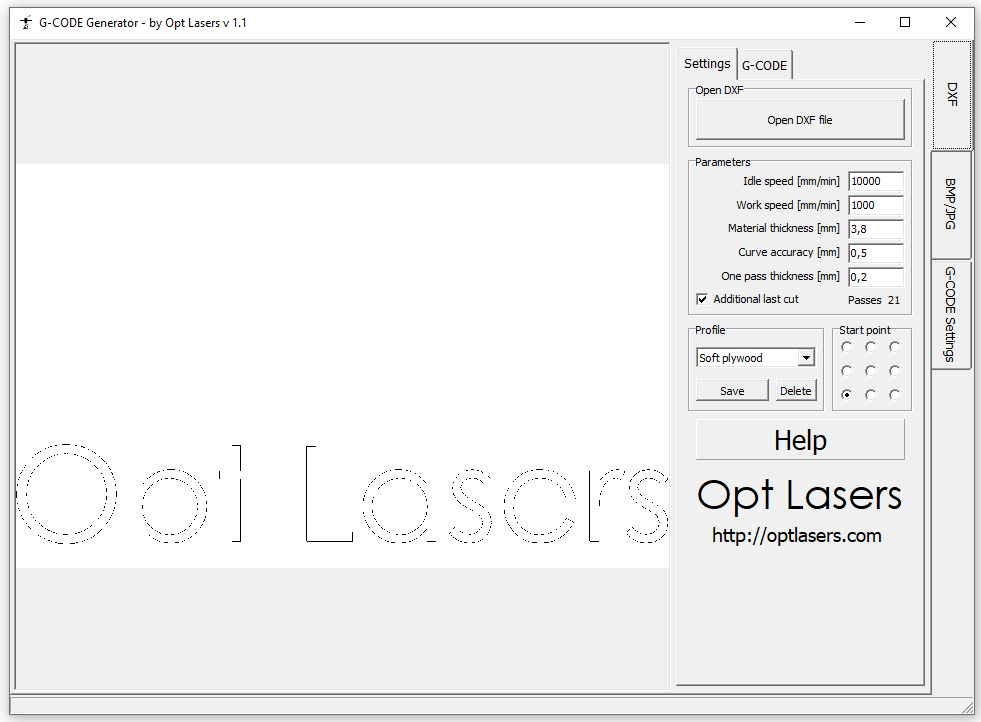
- Open DFX file.
- Alter Settings > Parameters as needed.
- Idle Speed
- Rapid movement feed rate used when laser is moving to an area to engrave/cut.
- Set to a high feed rate, like 8000 mm/min or higher.
- Lower this feed rate if movements create too much vibration.
- Work Speed
- Slower movement feed rate used when laser is engraving/cutting.
- Lowering this value can help get deeper cuts, darker engravings, smoother lines.
- Material Thickness
- Used to determine passes needed when cutting through material.
- Curve Accuracy
- Value determines steps in curve. Lower number = smoother curve
- Leave at default.
- One-Pass Thickness.
- Material cut per pass of the laser.
- Setting this value to 1 for 5mm thick material will result in 6 passes, 1 pass on the top, and 5 additional passes, each lowering the z-axis by 1mm. This will cut all the way through the 5mm thick material
- Additional Last Cut
- Adds one additional pass at the end.
- This helps with ensuring a clean cut on material that might not be constant.
- Profile
- Present for your material that you can save to and load from.
- This can help you build "profiles" for known working settings.
- Start Point
- The starting point of your work area. Change this dependent on where you want to zero your work area to.
- Best to set this to the lower left corner.

- Click G-Code Tab.
- Generate G-code.
- Save G-code to file.
- To be engraved with Grbl-Panel, or similar software
Raster: BMP/JPG
BMPs and JPGs are raster-based file types. Raster engraving is best for images will a lot of detail.
Raster images have to be scanned onto the workpiece, the laser intensity dictates the depth or darkness of the image being output. The technique is similar to how an image scanner scans a paper into the computer. Reference the Common Cutting Parameters for a good starting place for some common materials.
- Open BMP or JPG.
- Alter Settings > Parameters as needed.
- Idle Speed
- Rapid movement feed rate used when laser is moving to an area to engrave/cut.
- Set to a high feed rate, like 8000 mm/min or higher.
- Lower this feed rate if movements create too much vibration.
- Work Speed
- Slower movement feed rate used when laser is engraving/cutting.
- Lowering this value can help get deeper cuts, darker engravings, smoother lines.
- Material Thickness
- Used to determine passes needed when cutting through material.
- Pixel Size
- Set the size of a pixel. Used to help scale the image.
- Example: 1 pixel = 0.1 mm (10 pixels will fit in 1 mm scan line)
- X and Y Resolution.
- Used to specify the source image resolution.
- Keep Aspect Ratio
- Keeps the image proportional as you scale.
- Fit
- Fits the image to the window display. Just used for previewing.
- Alter Image Settings as needed.
- Image Scanning
- Horizontal and Vertical Raster
- The orientation of image scanning to use.
- Grayscale
- Enabling Grayscale will generate an engraving that will include all values within the min and max power settings, giving you more… grayscale.
- Disabling Grayscale will cause the laser just to perform at its min and max power settings, ON/OFF, with no middle range.
- Dithering
- Enabling Dithering will render the image as a Dithering Map.
- Dithering if useful if an image is not engraving deep enough.
- Power Control
- Laser power to be applied to the workpiece limited by the Min and Max settings.
- Correction.
- Basic image correction settings.
- Click Image settings Tab.
- Alter Image settings as needed.
- Click G-Code Tab.
- Generate G-code.
- Save G-code to file. [To be engraved with CNCjs, Easel, or similar software]